Using 3D models with Parts Craft (XPS edition)
Jul 6, 2020 9:11:03 GMT
sofia, LankyLefty17, and 5 more like this
Post by Shadow Master on Jul 6, 2020 9:11:03 GMT
After getting tons of requests from players asking how I create Parts Craft pieces in Fire Pro World, I thought I'd write out this little tutorial introducing players to XPS and the world of 3D modelling.
What is XPS?
XPS (or XNALara) is a simple to use and free to download 3D modelling program. XPS stands for XNA Posing Studio - a freeware game development software created by Microsoft.
Some of the earliest versions of XPS included posable models of Lara Craft from the Tomb Raider series (which is where the name "XNALara" comes from).
Why 3D models?
Since Fire Pro World uses sprite sheets for every edit piece, the idea of drawing out (an average of) 30+ sprites by hand might seem a bit overwhelming to some players.
My solution: skip drawing and rotate actual 3D models to make your own sprites.

Where can I get XPS?
You can download XPS from one of it's official pages by clicking HERE
Scroll down until you see the download links to the left for XPS and the add-on program Microsoft NET Framework.
You will need NET Framework or XNA Framework (depending on your system) for XPS to start without crashing.
Okay, I got XPS working. Where can I download models for XPS?
Google should be your first choice for browsing for XPS/XNALara models. Simply type in any character's name and add XPS or XNALara
on the end. For example - "TMNT XPS" will bring up these models:

Or maybe you prefer WWE models, try googling "WWE XPS":

Just like the Fire Pro community, not every model that comes to mind is available (yet); but new models are added often.
Organizing your downloaded models:
Before you extract the models you downloaded, create a new folder to store each model in like this:

In order to use the models you downloaded in XPS, you will need to make sure the folders containing each model have been placed in
the XPS data folder. Otherwise, the model may not show up when you start XPS.

Starting XPS:
Click on the XPS application icon to start XPS.

Loading models:
click File - Add model(s)... to get the following menu:

You can also add an image to the background with: Options - Assign background image ...

To move a model around: press and hold ctrl + shift + while clicking on the model with your mouse to drag and move it.
You can rotate the camera just by moving your mouse regularly.
To clone a model: File - Clone selected model
To lock the camera in place (so the model doesn't move once you found the perfect angle):

Posing a model:
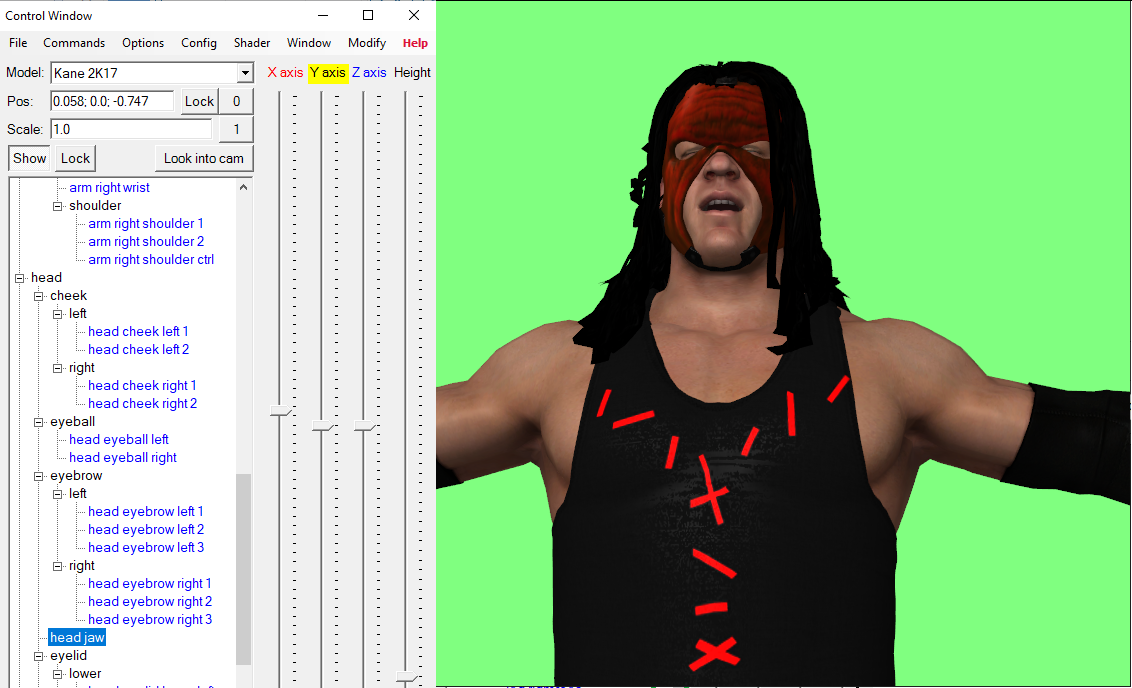
The key feature to XPS is the ability to pose various 3D models and their body parts/"bones". The menu to the left contains all of the posable body parts/
bones of this particular model.

For the above example, I have decided to move Kane's jaw by selecting the head section. Every body part can be adjusted with the X Y and Z axis dials.
You can also rotate the model without using the mouse by selecting the root ground bone then adjusting the X Y or Z axis.
Since models are ported by different users all over the world, certain models downloaded may have bones named in different languages (or none at all).
Removing parts of a model:
Perhaps the most useful aspect of XPS for Parts Craft makers is the ability to remove specific parts of a model.

What can be removed or adjusted visually varies from model to model.
To remove a part of a model: Options - Make items optional
Now highlight the body part you wish to make invisible and press OK. You will then be asked "Display optional items by default?" click no.
Each piece can be made visible again simply by going through the above steps and clicking yes at the last question.
Save your work:
File - Save scene - this option will save the selected models, poses, background color, lighting and other effects so that they can be
easily loaded the next time XPS is started up.
Editing mesh files:
Mesh files are visible pieces that make up 3D models. Almost all mesh files found on XPS compatible models can be modified in photo
editing programs like Adobe Photoshop CS.
This is a mesh file of Asuka's face from an XPS compatible model when opened in Photoshop:


Every graphical change saved to the mesh file in the photo editing program will appear on the XPS model when the model is loaded again!

You can even turn textures off entirely by unchecking Options - Display textures - Diffuse maps
Or checking Options - Display wireframe
Saving an image:
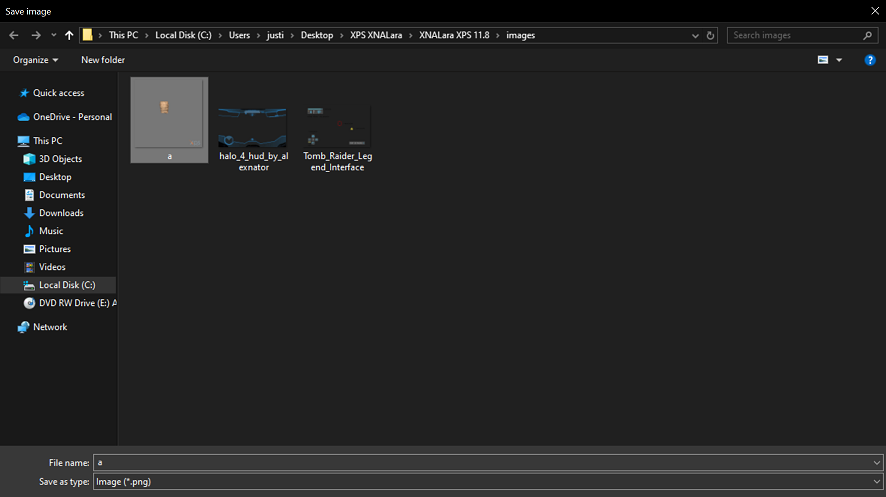
File - Save image or use the Print Screen (Prt Scrn) button on your keyboard/mouse.
And from here you can take your rotated/modified XPS models into a photo editing program and add them to any Parts Craft sprite sheets.
This brief walkthrough is just a sample of the features that can be found in XPS.
I hope you guys found this tutorial helpful.
What is XPS?
XPS (or XNALara) is a simple to use and free to download 3D modelling program. XPS stands for XNA Posing Studio - a freeware game development software created by Microsoft.
Some of the earliest versions of XPS included posable models of Lara Craft from the Tomb Raider series (which is where the name "XNALara" comes from).
Why 3D models?
Since Fire Pro World uses sprite sheets for every edit piece, the idea of drawing out (an average of) 30+ sprites by hand might seem a bit overwhelming to some players.
My solution: skip drawing and rotate actual 3D models to make your own sprites.

Where can I get XPS?
You can download XPS from one of it's official pages by clicking HERE
Scroll down until you see the download links to the left for XPS and the add-on program Microsoft NET Framework.
You will need NET Framework or XNA Framework (depending on your system) for XPS to start without crashing.
Okay, I got XPS working. Where can I download models for XPS?
Google should be your first choice for browsing for XPS/XNALara models. Simply type in any character's name and add XPS or XNALara
on the end. For example - "TMNT XPS" will bring up these models:

Or maybe you prefer WWE models, try googling "WWE XPS":

Just like the Fire Pro community, not every model that comes to mind is available (yet); but new models are added often.
Organizing your downloaded models:
Before you extract the models you downloaded, create a new folder to store each model in like this:

In order to use the models you downloaded in XPS, you will need to make sure the folders containing each model have been placed in
the XPS data folder. Otherwise, the model may not show up when you start XPS.

Starting XPS:
Click on the XPS application icon to start XPS.

Loading models:
click File - Add model(s)... to get the following menu:

Some models may even include image previews. Simply click on the model you wish to use and click OK.
I've decided to load Kane.
XPS basics:

By default, the landscape will include ground tiles and a grey background.

To remove the ground: Options - Display ground then make sure the setting is unchecked.
To change the background color: Options - Set background color ...
I've decided to load Kane.
XPS basics:

By default, the landscape will include ground tiles and a grey background.

To remove the ground: Options - Display ground then make sure the setting is unchecked.
To change the background color: Options - Set background color ...
You can also add an image to the background with: Options - Assign background image ...

To move a model around: press and hold ctrl + shift + while clicking on the model with your mouse to drag and move it.
You can rotate the camera just by moving your mouse regularly.
To clone a model: File - Clone selected model
To lock the camera in place (so the model doesn't move once you found the perfect angle):

Posing a model:
The key feature to XPS is the ability to pose various 3D models and their body parts/"bones". The menu to the left contains all of the posable body parts/
bones of this particular model.

For the above example, I have decided to move Kane's jaw by selecting the head section. Every body part can be adjusted with the X Y and Z axis dials.
You can also rotate the model without using the mouse by selecting the root ground bone then adjusting the X Y or Z axis.
Since models are ported by different users all over the world, certain models downloaded may have bones named in different languages (or none at all).
If you'd like to save a pose: File - Save selected pose ...
Removing parts of a model:
Perhaps the most useful aspect of XPS for Parts Craft makers is the ability to remove specific parts of a model.

What can be removed or adjusted visually varies from model to model.
To remove a part of a model: Options - Make items optional
Now highlight the body part you wish to make invisible and press OK. You will then be asked "Display optional items by default?" click no.
Each piece can be made visible again simply by going through the above steps and clicking yes at the last question.
Save your work:
File - Save scene - this option will save the selected models, poses, background color, lighting and other effects so that they can be
easily loaded the next time XPS is started up.
Editing mesh files:
Mesh files are visible pieces that make up 3D models. Almost all mesh files found on XPS compatible models can be modified in photo
editing programs like Adobe Photoshop CS.
This is a mesh file of Asuka's face from an XPS compatible model when opened in Photoshop:


Every graphical change saved to the mesh file in the photo editing program will appear on the XPS model when the model is loaded again!

You can even turn textures off entirely by unchecking Options - Display textures - Diffuse maps
Or checking Options - Display wireframe
Saving an image:
File - Save image or use the Print Screen (Prt Scrn) button on your keyboard/mouse.
And from here you can take your rotated/modified XPS models into a photo editing program and add them to any Parts Craft sprite sheets.
This brief walkthrough is just a sample of the features that can be found in XPS.
I hope you guys found this tutorial helpful.


